So today I'm going to share with you my experience of how to safely dye for our birds. The method I used was food coloring, and although some would recommend using Kool-Aid, I am not totally accepting of this method. My reasoning behind that, is koolaid flavors otherwise inedible substances. This causes the bird to recognize things like Popsicle sticks, beads and rope as food. I am not the only one who sees the potential dangers, so I opted for the food coloring method. Now for the fun stuff!
Ok, so first things first. Did you get that shopping list on my previous post? Great! Now I want you to add something on this list, it's very very important. Gloves. It took me nearly a week to get the stain out of my nails. Be forewarned.
My first mistake was in my water-to-dye ratio. At first, I filled several bowls with water and added maybe 10 drops of coloring in each. I also added some vinegar to help the color fast to the material. The vinegar seemed to work wonders later on, but initially I just didn't have enough color. Another thing I found, it's rather difficult with a paintbrush.
The beads did turn out quite nicely though!
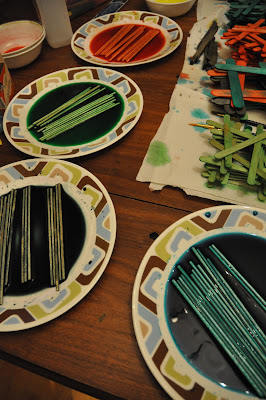
So here's what I ended up doing. First off, I nixed the bowls. I traded them in for these shallow desert plates so I would be able to let the items in question sit and absorb the dye. This proved to be much more effective, once in increased the dye concentrate. So using just enough water to fill the dish, you're going to want a cap full of vinegar, and about 20 drops of dye.
*Note* - Don't fret for your dishes! It washes out without a worry, and a layer of paper towel saved me from a big clean up. Not to mention Willow had a BLAST tearing it up when all was said and done.
For the Popsicle sticks, I found this was the best way to stack them. It allowed them to dry, didn't let the ink run and kept me stay organized (a personal issue of mine... organization.)
The bowls worked well for organizing my dowels.
I had some pretty awesome success dying my twine and hemp rope!
Now just a a few tips and tricks and warnings! I'll put them all point form here for easy reference.
- For the sake of your fingers, invest in some latex gloves.
- Don't be shy with your dye! When in doubt, add more. You really don't need much water.
- Vinegar helps! Just a cap full will do ya.
- Yellow really didn't work for me.
- Red and Yellow, in theory makes orange but I couldn't quite get it. I'm sure it IS possible.
- Blue and Red, my purple look like horse poop. This being one of my favorite colors, I was pretty bummed out. Waking up was like Christmas morning! All the colors were so vibrant, ESPECIALLY my purple. So give it a chance! (I'm kicking myself, as I didn't think to photograph the finished product)
Have FUN! Send me pictures! Share your thoughts :)


Thanks for the information. I look forward to the assembly part of this :). I am waiting for my first parrot, a WC Pionus to be ready to come home to us around the end of Feb so this will be a great activity for me and my son. I found you on parrots.com forum, I am mnkeastman there :D
ReplyDelete